> ## Documentation Index
> Fetch the complete documentation index at: https://docs.ecomwize.io/llms.txt
> Use this file to discover all available pages before exploring further.
# Creating Pages
> Learn how to create new landing pages in EcomWize Builder from a prompt, a template, or manually.
Creating a new page is the first step in building your Shopify landing page. EcomWize offers three methods: generating with an **AI prompt**, starting from a **template + prompt**, or creating a **blank page** manually.
## Method 1: Create with AI Prompt
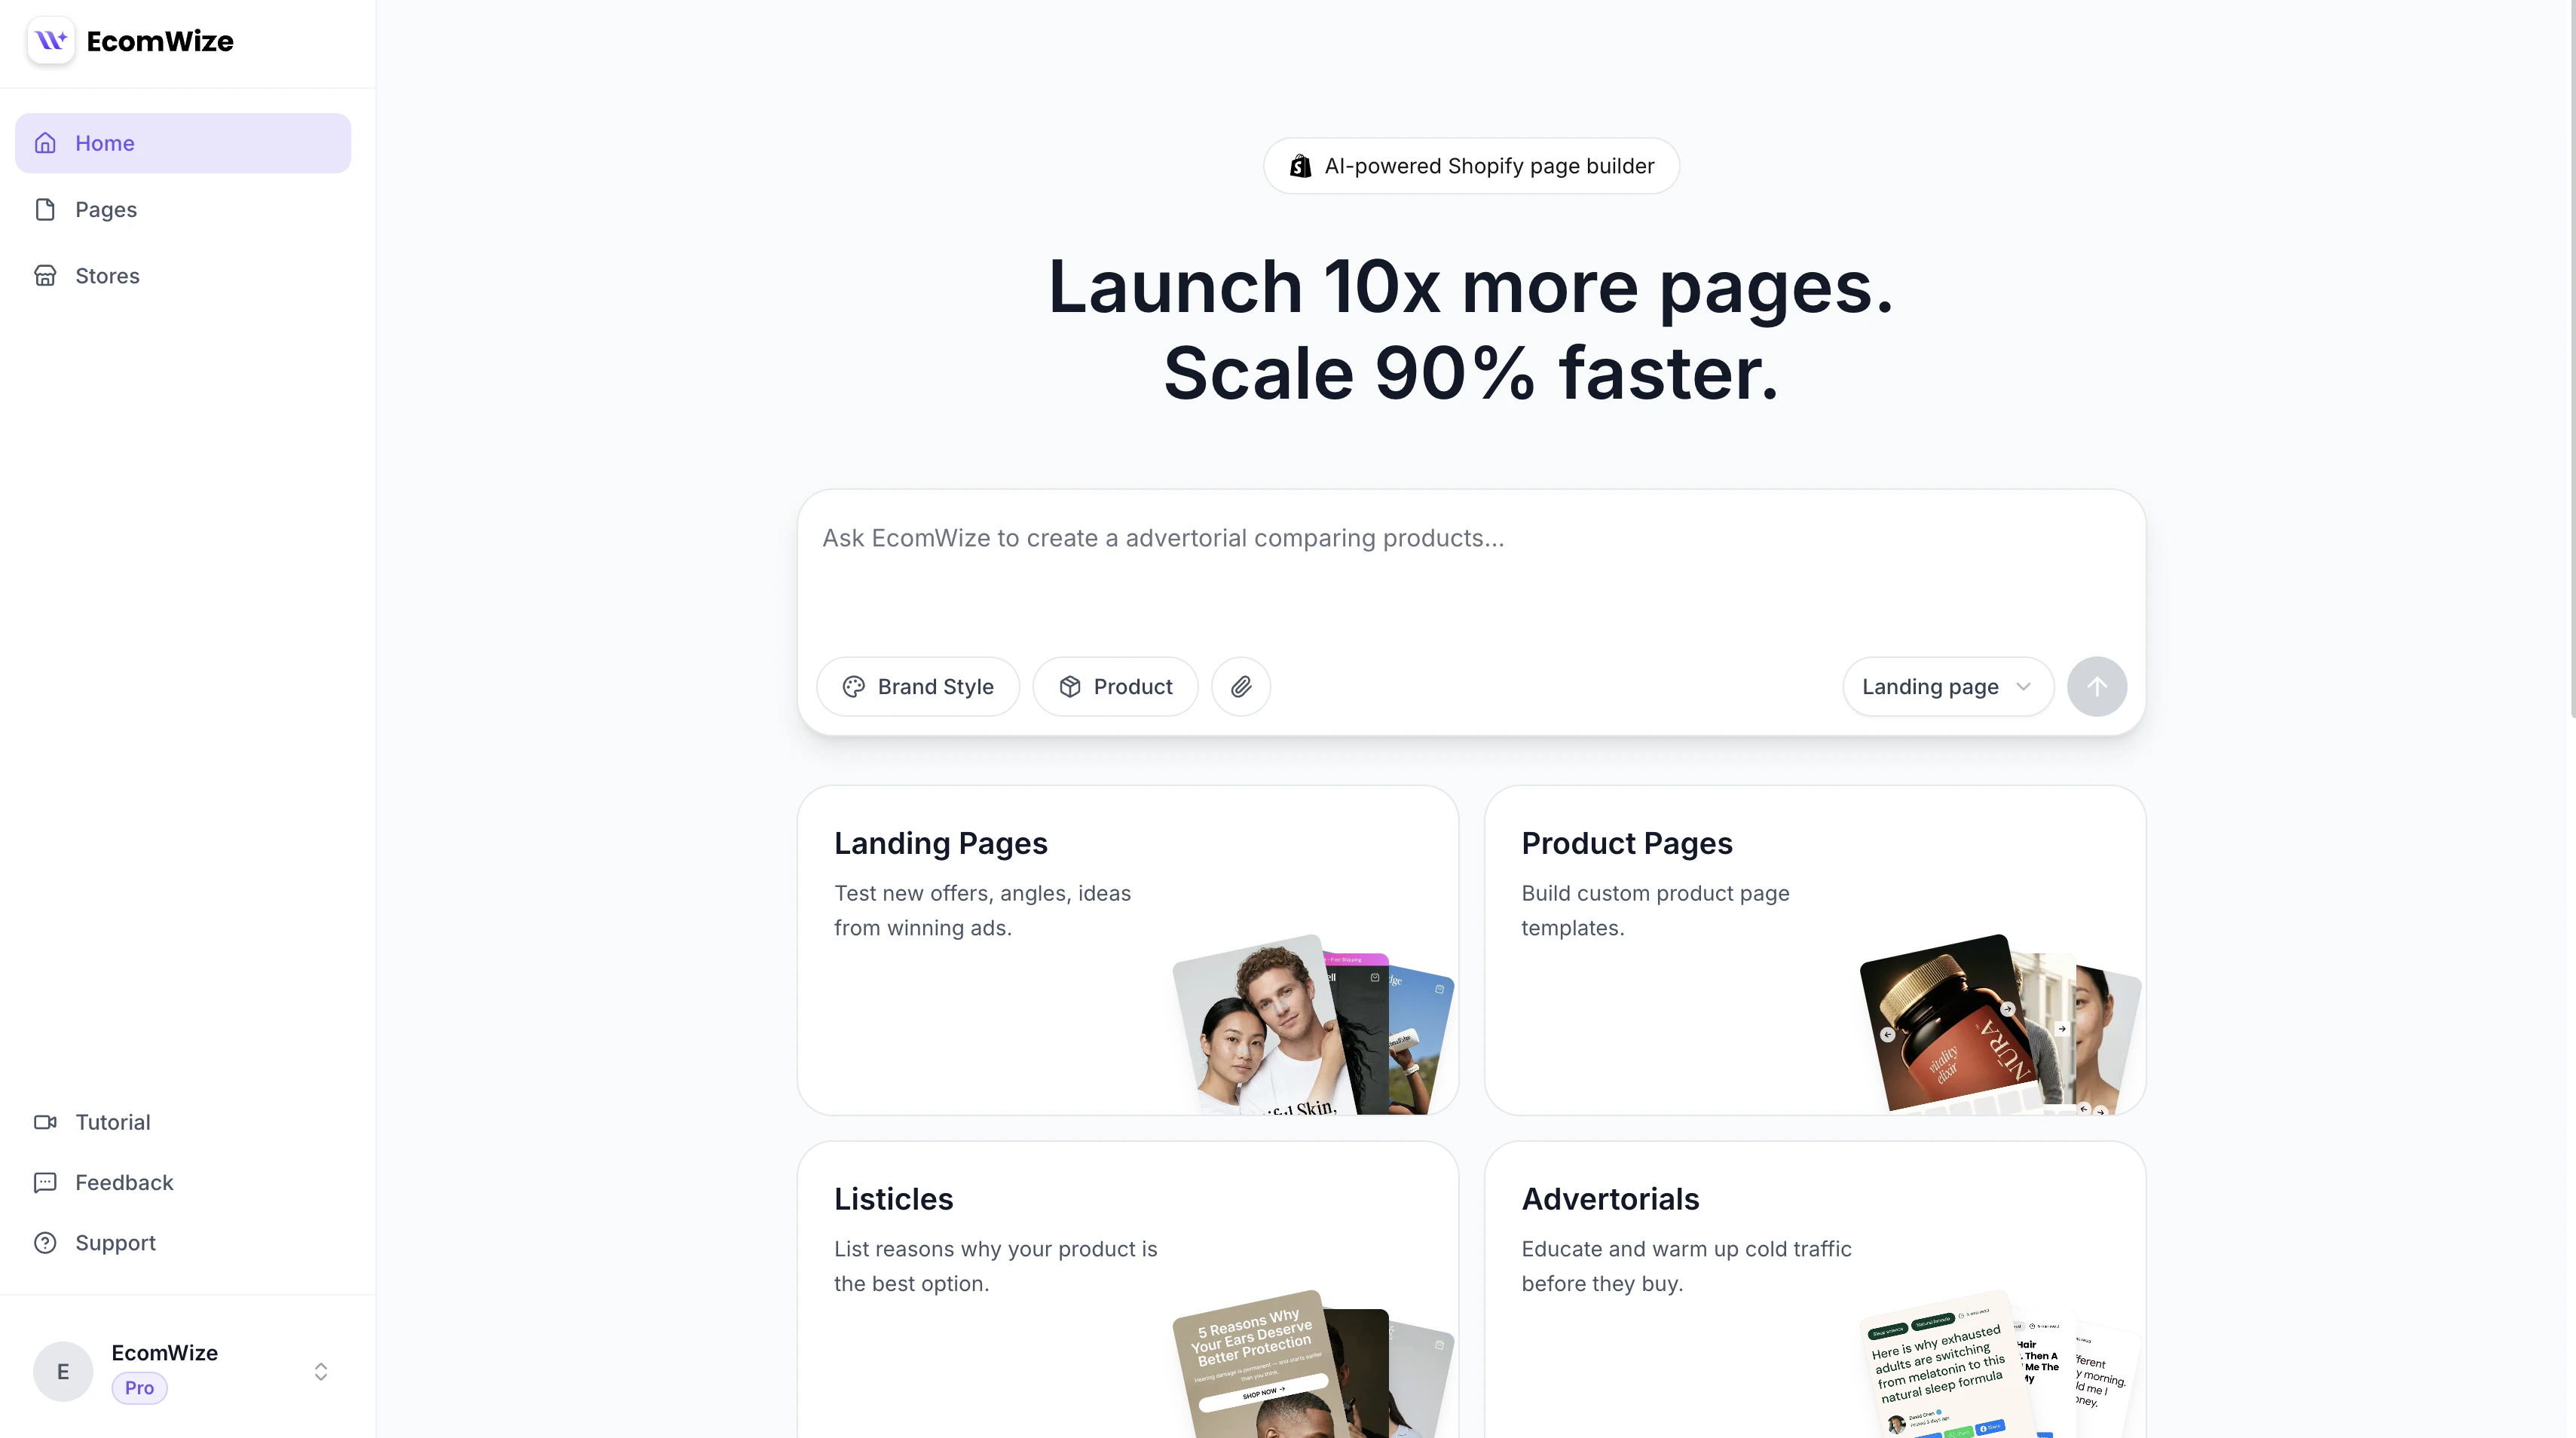 From the dashboard, type a detailed prompt in the input field at the top. Describe your product, target audience, emotional angle, and desired positioning.
Use the **dropdown next to the submit button** to choose a page type: Landing Page, Product Page, Listicle, or Advertorial. Below the input, optional page type cards provide suggestions and inspiration.
Choose a brand style from the dropdown. The brand style determines all typography, colors, spacing, and visual properties for your page.
Press **Enter** or click the send button. Your new page is generated and you are automatically redirected to the builder.
## Method 2: Create from Template + Prompt
Scroll down on the dashboard to find the template gallery. Filter by category (Landing Pages, Product Pages, Listicles, Advertorials) to find a relevant starting point.
Hover over a template card and click **Generate** to use it as a starting point, or click the card to preview it first. If you are previewing, click **Use template** in the preview header.
The template is tagged in the prompt input. Add a custom prompt to describe what changes you want, select your brand style, and optionally link a product.
Submit the form. The template's sections are loaded into the builder with your AI-generated customizations applied.
From the dashboard, type a detailed prompt in the input field at the top. Describe your product, target audience, emotional angle, and desired positioning.
Use the **dropdown next to the submit button** to choose a page type: Landing Page, Product Page, Listicle, or Advertorial. Below the input, optional page type cards provide suggestions and inspiration.
Choose a brand style from the dropdown. The brand style determines all typography, colors, spacing, and visual properties for your page.
Press **Enter** or click the send button. Your new page is generated and you are automatically redirected to the builder.
## Method 2: Create from Template + Prompt
Scroll down on the dashboard to find the template gallery. Filter by category (Landing Pages, Product Pages, Listicles, Advertorials) to find a relevant starting point.
Hover over a template card and click **Generate** to use it as a starting point, or click the card to preview it first. If you are previewing, click **Use template** in the preview header.
The template is tagged in the prompt input. Add a custom prompt to describe what changes you want, select your brand style, and optionally link a product.
Submit the form. The template's sections are loaded into the builder with your AI-generated customizations applied.
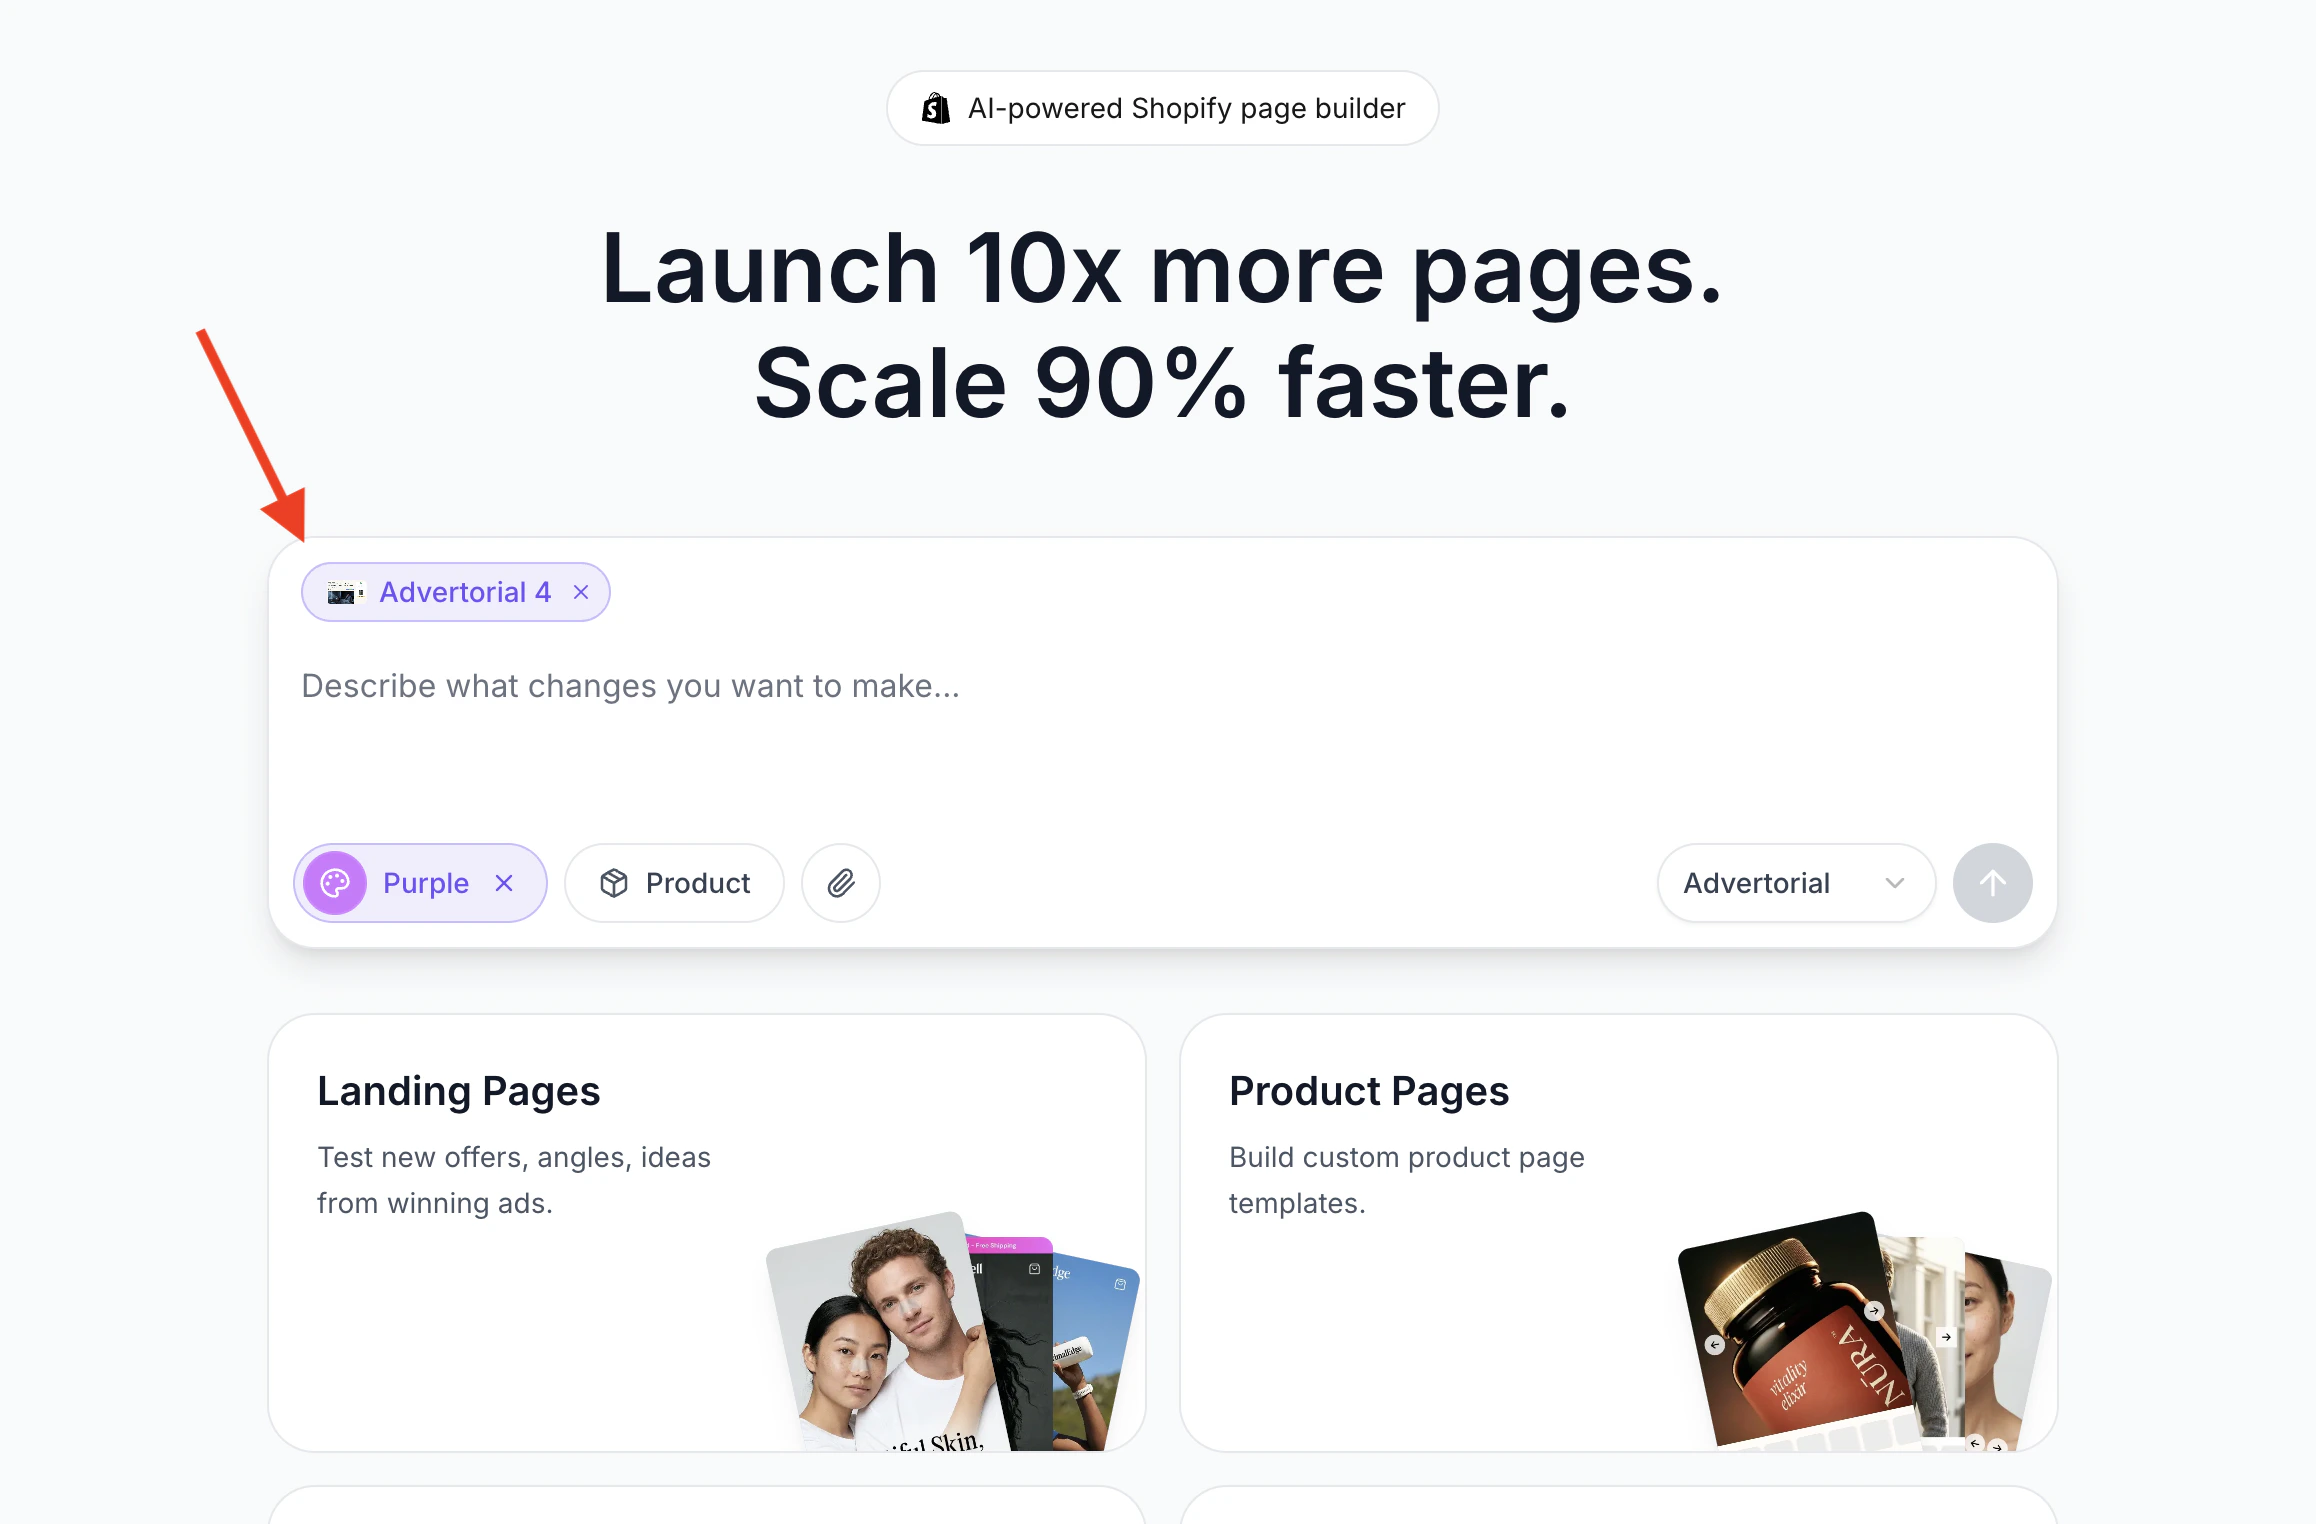 Templates give you a head start with pre-configured sections and content. After creating the page, you can add, remove, reorder, and fully customize every section.
## Method 3: Create a Blank Page
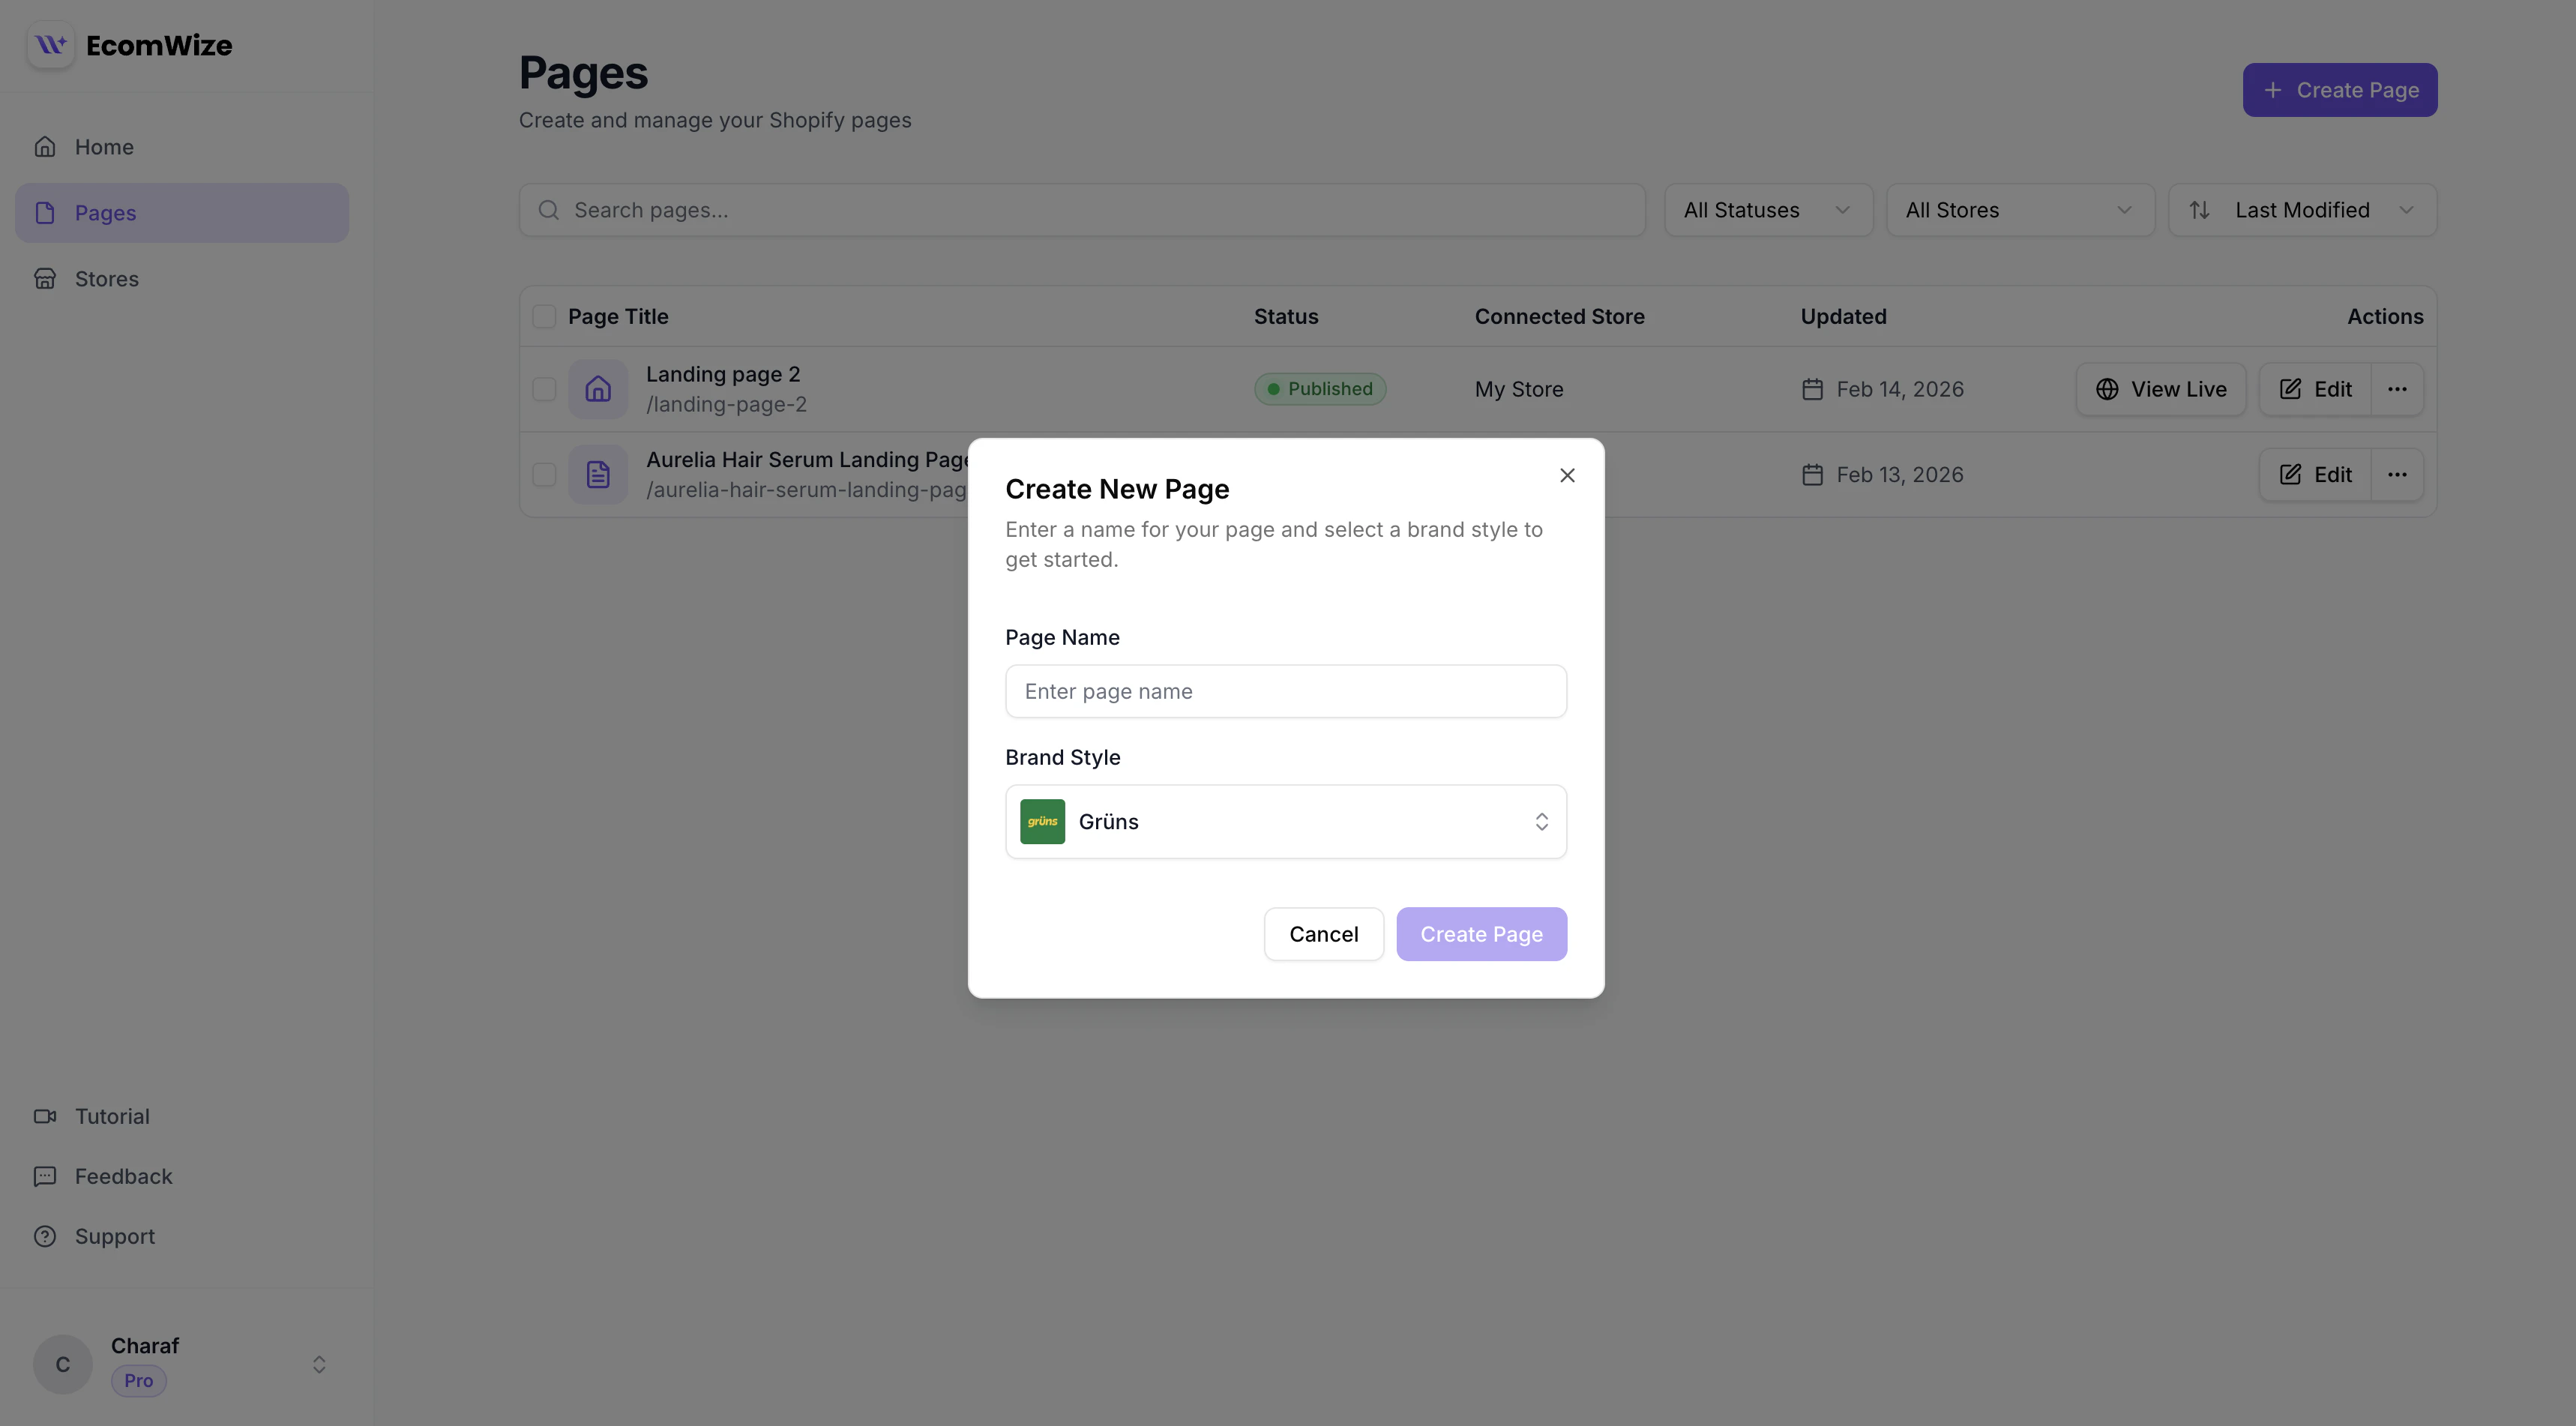
From the pages list, click the **New Page** button (or the **+** button). The Create Page dialog opens.
Type a name for your page in the **Page Name** field. This is required and will be used as the page title.
Choose a brand style from the dropdown. The brand style determines all typography, colors, spacing, and visual properties for your page.
Click the **Create** button. Your new page is created and you are automatically redirected to the builder where you can start adding sections.
Templates give you a head start with pre-configured sections and content. After creating the page, you can add, remove, reorder, and fully customize every section.
## Method 3: Create a Blank Page
From the pages list, click the **New Page** button (or the **+** button). The Create Page dialog opens.
Type a name for your page in the **Page Name** field. This is required and will be used as the page title.
Choose a brand style from the dropdown. The brand style determines all typography, colors, spacing, and visual properties for your page.
Click the **Create** button. Your new page is created and you are automatically redirected to the builder where you can start adding sections.
 ## Required Fields
| Field | Required | Description |
| ----------- | -------- | ----------------------------------------------------- |
| Page name | Yes | The title displayed in the pages list and browser tab |
| Brand style | Yes | The design system applied to all sections on the page |
## Optional Configuration
After creating a page, you can configure additional settings in the Page Settings panel:
* **Store connection** -- Link the page to a Shopify store for publishing
* **Product link** -- Connect a product for product-specific sections
* **URL handle** -- Customize the URL slug for SEO
* **Meta description** -- Add a description for search engines
* **Template type** -- Choose between "page" and "product" template types
These can all be configured later and are not required during initial page creation.
## Page Status
Every new page starts with a **draft** status. This means:
* The page is not live on any Shopify store
* You can freely edit and experiment without affecting your storefront
* The page does not count toward your published page limit
* You must explicitly publish the page to make it live
You can create unlimited pages on all plans, including the Free plan. The plan limit applies to **published** pages, not total pages created.
## Plan Limits
While page creation is unlimited across all plans, the publishing limits differ:
| Plan | Pages You Can Create | Pages You Can Publish |
| ------- | -------------------- | --------------------- |
| Free | Unlimited | 0 (preview only) |
| Starter | Unlimited | Up to 10 |
| Pro | Unlimited | Unlimited |
If you attempt to create a page without sufficient AI credits, the system will inform you and offer an upgrade path.
## After Creating a Page
Once your page is created, you land in the builder with an empty canvas (or template sections if you used a template). From here you can:
1. **Add sections** from the sections panel on the left sidebar
2. **Drag and drop** sections to reorder them
3. **Edit content** by clicking on text, images, and other elements
4. **Configure sections** using the right-side configuration panel
5. **Preview** your page in desktop and mobile views
6. **Publish** when you are ready to go live
## Required Fields
| Field | Required | Description |
| ----------- | -------- | ----------------------------------------------------- |
| Page name | Yes | The title displayed in the pages list and browser tab |
| Brand style | Yes | The design system applied to all sections on the page |
## Optional Configuration
After creating a page, you can configure additional settings in the Page Settings panel:
* **Store connection** -- Link the page to a Shopify store for publishing
* **Product link** -- Connect a product for product-specific sections
* **URL handle** -- Customize the URL slug for SEO
* **Meta description** -- Add a description for search engines
* **Template type** -- Choose between "page" and "product" template types
These can all be configured later and are not required during initial page creation.
## Page Status
Every new page starts with a **draft** status. This means:
* The page is not live on any Shopify store
* You can freely edit and experiment without affecting your storefront
* The page does not count toward your published page limit
* You must explicitly publish the page to make it live
You can create unlimited pages on all plans, including the Free plan. The plan limit applies to **published** pages, not total pages created.
## Plan Limits
While page creation is unlimited across all plans, the publishing limits differ:
| Plan | Pages You Can Create | Pages You Can Publish |
| ------- | -------------------- | --------------------- |
| Free | Unlimited | 0 (preview only) |
| Starter | Unlimited | Up to 10 |
| Pro | Unlimited | Unlimited |
If you attempt to create a page without sufficient AI credits, the system will inform you and offer an upgrade path.
## After Creating a Page
Once your page is created, you land in the builder with an empty canvas (or template sections if you used a template). From here you can:
1. **Add sections** from the sections panel on the left sidebar
2. **Drag and drop** sections to reorder them
3. **Edit content** by clicking on text, images, and other elements
4. **Configure sections** using the right-side configuration panel
5. **Preview** your page in desktop and mobile views
6. **Publish** when you are ready to go live